原文链接: steemit, cnsteem, chainbb, busy, markdown
The photographs taken by your camera or smartphone are usually unnecessarily large for posting on Steemit. They do nothing but slow down the loading of your post when others browse your post and waste their time. They might lose their patience and close your post. If the images are resized to figures with the width of 800 pixels before uploading, the size could be 10% of the original size, or even smaller, without losing any visual effect.
我们常常把照片上传到Steemit上,这些照片文件一般都太大,根本没必要。他们只会让你的帖子打开时非常慢,浪费读者的时间和带宽。说不定读者失去了耐心,索性不看你的帖子了。如果在上传前压缩到 800 像素的宽度,那么文件大小会低于原来的10%,并且肉眼看起来不会有任何画质的损失。
There are many ways to resize and compress multiple images. For example, @tvb suggested using a macro or action recorder in Photoshop, while @tumutanzi introduced a method of using Outlook. Both are good. But what if you want to insert your own water mark to multiple images in the meanwhile?
批量压缩多个图片的方法有很多。例如, @tvb 推荐用 Photoshop 的动作记录(宏), 而 @tumutanzi 用的是Outlook。这两种方法对压缩图片都很管用。但是,如果你想同时给多张图片添加水印,该怎么办?
It is easy. Here I introduce a tip, which can resize and insert your watermark into hundreds of images in seconds, with one single click. At the end of this post, I have an animation gif figure for you to show how it works.
很简单。这里介绍个方法,可以一键压缩、转换千百张图片,同时插入水印,只需几秒钟。下面是文字步骤。我制作了一个动图放在文末,来演示使用方法。
Before conversion, please follow my previous post and create your own steemit watermark with a transparent background.
开始前,请参照我之前的帖子 Powerpoint 制作你的专属 Steemit 透明背景水印,制作一个你的水印图片文件。
Now let ’s go.
Download and install the free software irfanview. Download my setting file ‘steemit-watermark.ini’.
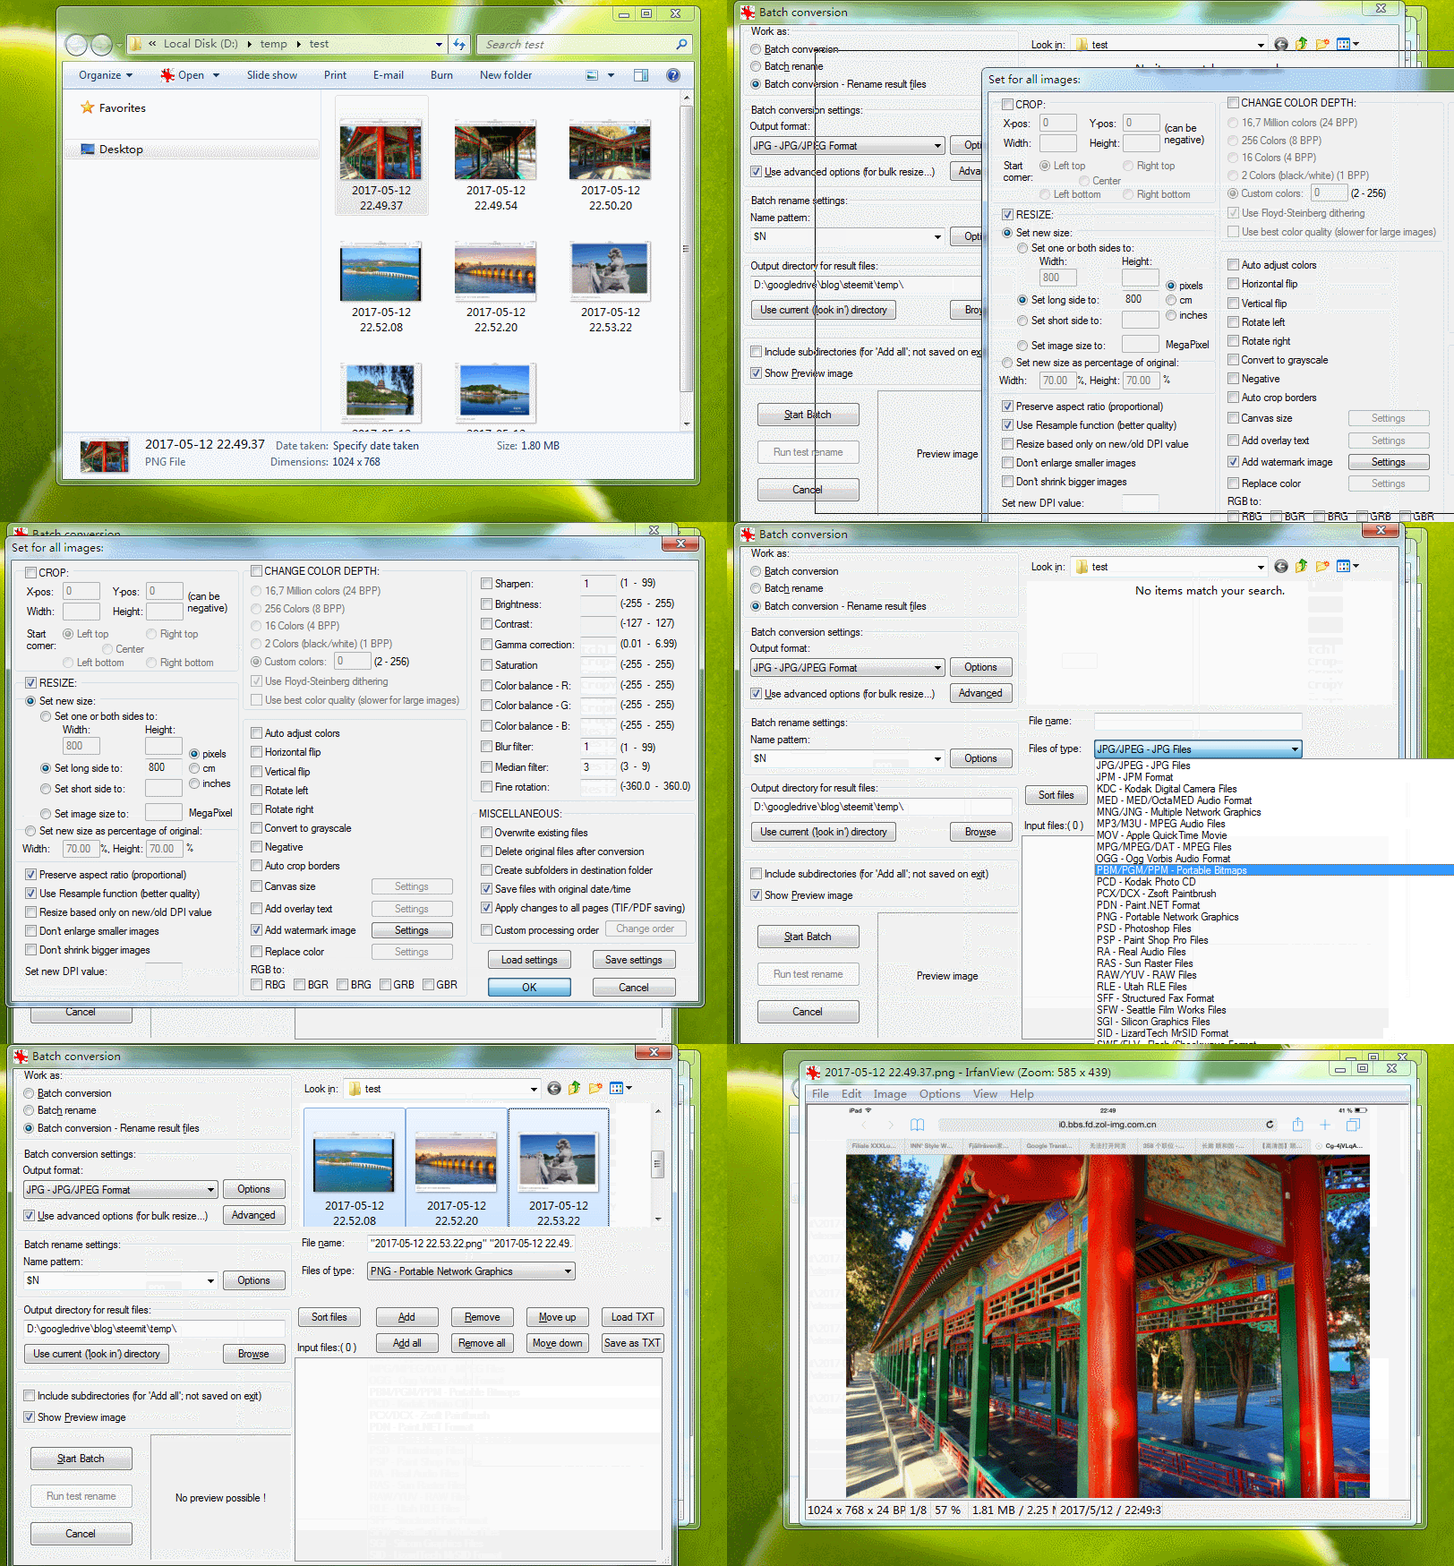
Open a figure with irfanview. Then press ‘b’ to open the batch conversion dialogue window.
On the left panel, choose ‘Batch conversion’. Choose JPG as Output format. Choose ‘Use advanced options’ and click ‘Advanced’.
In the pop-up dialogue window, click ‘load settings’, and choose ‘steemit-watermark.ini’ you downloaded just now.
Click ‘Add watermark image’
Settingsbutton, and choose your watermark file. ClickOK, andOKagain. Now you are back to the batch conversion dialogue window.Choose your Output directory for result files.
On the right panel, choose the figure files and click ‘Add’. Use ctrl or shift to choose multiple files.
Click
Start Batchbutton.
Done! All the selected figures have been resized, compressed and your watermark has been inserted into every figure!
Wait a second…… Did I say ONE SINGLE CLICK?
Yes, I did. The steps I mentioned above are only necessary for the first time. When you open ifranview next time, just press ‘b’ to open the batch mode, then choose your figures, click ‘Start Batch’, and DUANG! Done! Even if you have millions of images.
If you want to only resize the images without inserting a watermark, just uncross the ‘Add watermark image’ option in Step 5.
Ifranview is one of the MUST software I have been using for years. It has many functions which you could have fun with.
Happy Steeming!
下载安装免费软件 irfanview. 下载 我的配置文件 ‘steemit-watermark.ini’.
用 irfanview 打开任意一个图片. 按 ‘b’ 打开批处理窗口.
在左边面板选择
批处理Batch conversion. 输出格式Output format选为JPG. 勾选使用高级选项Use advanced options并点击高级Advanced按钮.在弹出的对话框里点击
load settings按钮, 选择你刚刚下载的steemit-watermark.ini.点击
添加水印图片Add watermark image后面的设置Settings按钮, 然后选择你在任务1做好的水印图片. 点击确认OK, 再点确认OK就退回了批处理窗口.选择你用来保存新文件的
输入路径Choose your Output directory for result files.在右面板,选择将要转换的图片,可以用ctrl 或shift 键多选。点击添加
Add按钮.点击
开始批处理Start Batch按钮.
搞定!所有选中的图片都被压缩并添加了水印。
等等……不是说一键完成么?这点了几次键?
是的。我不是吹牛。上述步骤只是第一次使用时这么操作。下回你再打开 ifranview,直接按 ‘b’ 进入批处理窗口,选择要处理的图片,然后只需点一下 ‘Start Batch’, DUANG! 搞定!哪怕你有千万张图片,也就是这一键而已。
如果你只想批量压缩图片,不想加水印,那么只???将第5步里的’Add watermark image’ 选项取消即可。
Ifranview 是我用过多年的必装软件。它的功能非常丰富,有待你的挖掘。
好好享受批处理的快乐吧!
